Tally Surrender License Use another computer in Hindi

Dosto agar aap  Kisi Company ke Employee he or us Company ke PC me Active License mode me Tally par work kar rahe. Or aapke office me tally me kam Jyada he aap chahte he ki kuch kam ghar ke apne leptop per Tally software me kam kiya jay, lekin apke ghar ke software me Active License nahi he.
tallyseekhe

dosto hum is post ke madat se seekhate hai ki tally ke Ek Single License ko ek se adhik system me active karke Tally me kam kaise karte.

How to use Tally 1 License to other computer.

Is ke liye tally me hame Jis company me work karna he uski backup file banani hoti. or us file ko apne ghar ke computer or Laptop me Paste karni hoti he taki jaha hamne company me jinti Entries ki thi hum usi se Age ki date me apne computer me kam kar sake. to iske liye hame some Step follow karne honge.
Step1:-Office ke Active License tally Software ko Open kare.
Step2:-Alt+F3 press kare Company Info me jane ke liye.
Step3:-Backup ke liye B press kare.
apke samne Select Companies to Backup open ho jayegi.
Step4:-Destination me E:\ ya D:\ ya apne pendrive ka path type kare, jaha per aap Company ke Backup file ko rahna chhahte hai.
then
Press Enter Enter
ab tally me apke samne C:\ Drive ki sabhi compnies open hojayegi in companies se apko wo company select karni he jisme apko  work karna he
Step5:-company ko select karne ke baad
then select End of list
then Accept press A or Enter
aapki company ki Backup file Create hokar aapke My compter ya This PC ke E:\ ya D:\ ya fir Pendrive me save hogayi he. aapko ye file apne ghar ke computer me kisi bhi drive me Move or Paste karni he.
Step6:-aab Esc press karke tally ke Company info me Aye.
Company ke tally se Active License ko hotane ke liye

How to remove Active License in tally

Step7:- apko F12 configure me jana he fir Licensing  ke liye L press kare General category me Surrender License  Option me Enter kare.
tallyseekhe
tally Surrender License
Agar Tally aap se Administrator Permisstion ya Rights ke liye kahega "Restart" to apko
Yes me click karna he
then
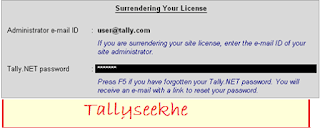
apke tally me Surrendering Your Lience ka Option open ho jayega
yaha par apko apne tally ka
tallyseekhe in Hindi
tally Simply Learn in hindi
Administrator e-mail ID and Tally.NET password
Enter karna fir Enter Enter press karne ke bad
comformation message(Press Enter to Surrender your license.)
show hoga fir
Accept kare.
is prakar  apka office ke tally se  License Version Deactivate ho jayega or apka tally Education Version ke Aa jayega.
Note:- Internet conection on hona chahiye.
Step8:-Ab Apko apne ghar ke computer me pendrive lagakar apne Office ke Company ki Backup file ko Cut karke My Computer ke E:\ Drive me Paste karna he.
or fir Tally softewere  ko open karna he.
iske bad apko Computer me Tally Education mode ko open karna he fir
Step9:-Reactivate Your Existing License me Enter karna he.

tallyseekhe
open Administrator me Yes karna he.
apke samne tally ka kuch is tarah ka layout open ho jayega.
yaha par apko Office ke Tally ka Administrator Email ID or Password fill karna he.
iske bad Apke Tally me Office ka License Activate ho jayega.
ab aapko tally me apni Office ki Company jisme Entries karni he use Restore karna he. iske liye
Tally me Company Info ke option me jana hota he.
Press Atl+F3 go to Company Info
fir Enter  Restore me Enter kare ya R press kare.
Source me Us Path ko type kare jaha par apne Company ko pendrive se paste kiya he jaise E:\ type kare

Then Enter button press kare
Backup  se apni company ko select kare
fir
End of list select kare
Accept ke liye A press kare.
is prakar Apke tally me Company Entries karne ke liye Ready hokar  tally me aa jayegi
ab aap Office ke Books of Account, bills ya Vouchers  se Ghar me Aram se Entries kar sakte.
Agar apne Entries Complete kar li he to fir
Aap
us Comany ka Backup banake use Pendrive se Move kare.
or fir ghar ke tally se License ko F12 press kare and Enter License >Surrender License.......
or Office me jakar pendrive se Backfile ko Office ke System (PC)  ke E:\ drive  me Cut karke paste kare. Fir tally ko open karke  Reactivate Your Existing License me Company ka Email or Password fill kare. or fir Company Info ke Pannel me Restor ke option me Enter karke us company ka Sourse E:\ select karke Accept  A kare
tally apse puchega
           Restore
Company Number (xxxxxx)already exists

Overwrite  the infomation?
(Y)as or (N)o
yaha par apko Y type karna he.
is prakar apki company me wo sabhi Entries aa jayengi jo apne apne ghar me ki thi
or aap usse age ki Entries apne office me kar sakte he.

dosto 
 aap facebook page "tallyseekhe" ke madyam se bhi humse jud sakte he.

tally Banking-deposit slip printing hindi

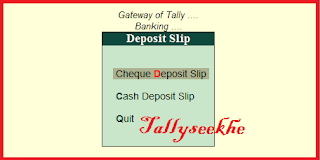
Dosto tally ke Banking Option me abhi tak hamne Cheque Printing, Cheque Register, Bank Reconciliation tak seekh chuke he is post me hum Deposit Slip, or Payment Advice ko print karna and Post Dated Sammery ko Janege lekin Isse Pahle ek bar hum inke bare me Jan lete he.
tally in hindi
Deposit Slip:- Jab ham apne bank me Cash or Cheque Jama karte he to bank hame Cash or Cheque jama karne ke liye ek tarah ki slip deta he Jis me Hame Apne Jama wali amount ka vivran fill karna hota he. Jise Deposit slip kaha jata he. tally me Bhi is slip ko deposit slip kaha jata he. tally me Ye Slip Bank Deposit wali Transaction karte samay create ki jati or Deposit Slip ko Tally me BaNking ke option me jakar print kiya jata he. or fir use bank me cash or cheque deposit ke samay jama kiya jata he. tally me Deposit slip 2 type ki hoti he.
1-Cash Deposit Slip
2-Cheque Deposit Slip
tally in hindi

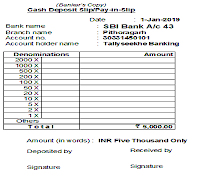
Cash Deposit Slip:-dosto jab hum Bank me Cash Deposit karte he Us time hame Deposit Slip me apne Deposit Dhanrashi (Money) ka Vivran dena hota kashkar Noto ke bare me. Tally me bhi Bank me Cash deposit Entry me bhi hame Transection ki Amount me Noto ka vivran fill karna padta he.Jise hum Deposit Slip kahte he.Tally me hume is Deposit Slip ka printout nikalne ka option milta he. jiski madad se hum bank or office ke liye Deposit Slip ki hard copy nikal sakte he.

Cash Deposit Slip Print kaise kare Tally me ?

Deposit Slip ko print karne ke liye apko tally me cash Deposit in Bank ki Entry karni hogi jisme me apko Depojit Amount me noto ka vivran fill karna hoga.
For Example: Cash Deposit in Bank a/c 5000 (2000x2, 500x2). (Voucher contra F4)
Entry complete ke bad some step follow karte he Cash Deposit Slip print karne ke liye.
Step:1-BaNking Option ke
Deposit Slip me Enter kare fir Cash Deposit Slip me Enter kare  or Bank A/c ka Ledger select jaha per cash Deposit karna he fir
Step:2-space button press karke us transection(cash deposit wali) ko select kare.
iske bad Alt+P (Print ke liye) press kare
Step:3-Print Preview Dekhne ke liye  Alt+I press kare.
Step:4-Then A press kare agar apka tally Education mode me he to Date of Printing me Month ki 1 or 2 date fill kare. Enter Enter press kare.
Step:5-Print ke liye A press kare
The Print ke liye A Press kare.
tally Banking

Zoom me click karke Banker's Slip Copy or Customer Slip ka vivran dekhe
tally learn in hindi
or print out nikanle ke liye

Step:6-Print me Click kare.

apke printer se printout nikal ayega.

tally in Hindi banking cheque print

Cheque Deposit slip:- Jab hamari company Cheque ke madyam se Amount Received karti he to us cheque ki details ko Deposit Slip me fill karke Use apne bank a/c me jama kar deti he. Tally me jab hum Cheque Received ki Entry karte he to Cheque ki details fill karne ka option Ata he jisme ham ne  Cheque Slip ka print out nikalane ke liye Cheque ki details fill karni hoti he. Tally me hame bank me Cheque deposit karne ke liye Cheque Deposit Slip print out ka bhi option milta he.

Cheque Deposit Slip kaise print kare.

Deposit Cheque  Slip print karne ke liye hume tally me Cheuqe Deposit Transaction ke Ek Entry karni hogi jisme hame Deposit Cheque ki details fill karni hogi.
For Example: Cheque Recieved from Debtor Amount 2,000.00(Receipt vocher F6 or F7 Journal voucher F7)
Entry complete ke bad some step follow karte he cheque  Deposit Slip ko print karne ke liye.
Step:1-BaNking Option ke
Deposit Slip me Enter kare fir Cheque Deposit Slip me Enter kare  or Bank A/c ka Ledger select jaha per Cheque Deposit karna he fir
Step:2-space button press karke us transection ko select kare.
iske bad Alt+P (Print ke liye) press kare
Step:3-Print Preview Dekhne ke liye  Alt+I press kare.
Step:4-Then A press kare agar apka tally Education mode me he to Date of Printing me Month ki 1 or 2 date fill kare. Enter Enter press kare.
Step:5-Print ke liye A press kare
The Print ke liye A Press kare.
Tally in Hindi

Zoom me click karke Banker's Slip Copy or Customer Slip ka vivran dekhe
tally seekhe

or print out nikanle ke liye

Step:6-Print me Click kare.
Jise ham ab cheque ke sath apne bank a/c me jakar jama kar sakte he.

            dosto iske bad tally me hame Payment Adivice ka option milta he to Jante he
kare
Cheque

Payment Advice:-Dosto Pyment Advice ke Option ko Janne se Pahle hum Payment Advice kya hota he Ise jaan lete he.Payment Advice ek Un (Vyektiyo)person ki payment list hoti he jinhe hamare bank ke dwara Bank ke madhyam se payment Diya jana  he.

Isse age hum apni Banking ki agli post me janege
Payment Advice or Post date Summery 
To Be Continue....................  
 ap facebook page "tallyseekhe" ke madyam se bhi humse jud sakte he.

tally Bank Reconciliation, Cheque Printing (Banking)

           dosto isse pahle humne tally me Cheque Print karna seekha. is post me hum Bank se Related Option Cheque Printing, Cheque Register, Bank Reconciliation, Deposit Slip, Payment Advice,  Post dated Sammery  ke bare seekhenge.
tally banking in hindi
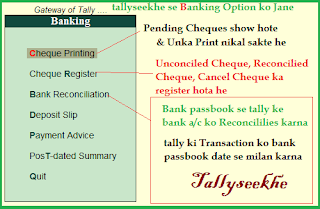
Getway of tally ke Utilities Category me hume Banking ka option show hota he. is option ki madad se hum apni bank ki pass book or cheque books to tally me Maintain karte he.
            Tally me Banking option me hume Some following option Show hote he.

BaNking
  1. Cheque Printing
  2. Cheque Register
  3. Bank Reconciliation
  4. Deposit Slip
  5. Payment Advice 
  6. PosT-dated Summery
 Cheque Printing:-Ye Option hume Print Cheque or Pending cheque ka Status batata he. yani Is option ke dwara hame Total Company dwara tally ke madyam se cheque dwara payment me print nahi huye cheque  or  print ho chuke cheque  show hote he. jinme hum kuch sudhar karke unka print nikal sakte he. sath is F6 press karke printed Cheque bhi Show or Edit kar sakte.
cheque print ki pahle post me hamne kewal 2 chueqe 00001 or 00002 ka printout  nikal ke payment ki Entry complete ki thi 
is option ko samajne ke liye hume ek Cheque ke dwara payment ki entry kar hogi.
for Example:- hamne kisi Creditor ko 1.4.18 ko 5000 ka payment Chuque no. 000003 karna he is transection ki Entry tally me karne par hamne cheque print nahi kiya. Agle din  hame Creditor ko cheque print karke 2.4.18 ke date me Cheque dena he. iske liye hame
tally me 
Banking ke Cheque Printing me enter karna hoga:
to hame panding Cheque me 000003 show hoga jiska printout nahi nikla he ab hum is option me F7 (edit Cheque details) Press karke Instrument no. to thik he  Instrument  date ko Edit karke 02.04.2018 me print out nikalne ke liye Accept kar dete he or fir
is Entry ke Enter Enter karke Last me Print out nikal lete he. 
ab hamare bank me panding cheques koi nahi he. sabhi printed cheque ko dekhane ke liye F6 press karte he.
Cheque Printing ka all shortcuts 
F2:date:-(jis din ke Cheque ka status dekhana he wo date fill kare)
F4:Bank:-(jis Bank ke Cheque ko dekhana he wo select kare)
F6:Show All( sabhi Cheque ka Status dekhe)
F7:Edit Cheque Details( Cheque ka number or date edit kare
Cheque Register:-Ye Option  Cheque book ka Register hota he. Is Register me Hame sabhi cheque books ke payment ke liye banaye gaye cheque show hote he. Jo Unreconciled(bank pass book se milan nahi kiya gaya he) hote he. jinhe hume is option ke dwara Bank pass book date se milan karke Bank date fill karke Reconcile karte he. jiske liye ham F5 press karte he.
dosto is hum example dawara samejte he.
 hamne abhi tak Cheque dwara payament ki 3 Entries tally me ki he. or bank pass book me Entry karne par hame pata chala ki
     abhi tak 1.4.2018 ko Creditor ko  chueqe 00001, 00002, and 00003(date:-02.04.18) ke dwara payement kiya he
 jise Creditor ne Apne Bank A/c  me Cheque no. 00001, ko 1.4.18 and Cheque no. 00002 and 00003 ko 02.04.18 ko apne a/c me diposit kiya he.
jinhe hame ab 01.04.18 and 02.04.18 ki date me Reconcile karna he.
iske liye hame 
Banking >Cheque Register> Select Bank >press F5
Cheque Register me F5 press karke Reconcile karna hoga
tally seekhe
 or bank passbook ki Entry date fill karke Accept karte he.
then ab hamare 3 cheque Reconcile ho gaye he.
tally seekhe
dosto Ager hum kisi cheque de dwara  party ko payment karte he bad me kisi karan se wo  Entry hame Daybook ke jakar cancel karni padti he to wo cheque hame Canceled Category me show hote he. or Out of 
tally in hindi
Period category me Unreconciles  kiye huye jinki date over ho jati he wo cheque show hote he.

Bank Reconciliation:-Bank Reconciliation ka matlab apne tally ke Bank Account ko apne bank ke passbook or Statement ke milaan karna hota he. ek tarah se ye hamari pass book hoti he. jisme hamare dwara tally me bank releted ki gayi sabhi Entries hoti he. jinka hamne apne bank ke passbook se Milan karna hota he. 
 dosto kai bar hame tally me bank Transaction ki Entry Current date me karte he. lekin bank me kisi karanwas wo transaction bad ke date me complete hoti. ese me tally me us transection ki date agal or bank passbook me agal hoti he. to ham tally me Bank Reconciliation option ke dwara bank passbook se us transaction ko Reconciles kar kar sakte he.
Bank Reconciliation tally me kaise kare.

Go to
 BaNking > Bank Reconciliation
Select Bank Ledger
then open Bank ledger for Reconciliation

Reconciliation ko hum Bank Ledger me Enter karke bhi kar sakte he.
iske liye hame Bank Ledger me jana hota he fir F5 buttion press karna hota he.

dosto  is hume Example ke dwara samajte he. hamne bank ki kuch transection 1.4.18 ko complete kari lekin bank passbook me in transection ki Entries 2.4.18 ko show ho rahi he or hume ab tally me bank ki 1.4.18 wali transection ko bank passbook se reconciles(milan) karna he. iske liye hume bank ledger me jakar f5 press karke 
bank date column me Date ko 2.4.18 kar karke Enter Enter press karke Accept kar lete he. 
tally in hindi
     is prakar dosto ham tally me apne bank ke ledger ka apne bank ke passbook or bank statement se milan karke apne bank a/c ko tally me properly maintain kar sakte he.
To Be Continue....................  
 ap facebook page "tallyseekhe" ke madyam se bhi humse jud sakte he.
 

tally banking Cheque Print in hindi

Tally me hame baking ka Option bhi milte he jiske dwara hum apne bank Account ko properly maintain kar sakte he jisme galti ki koi gunjais nahi rahti he. Ager humme Bank ki koi Entry miss kar di he ya bank me Entry ki date alag he or  tally me  date alag he to bhi hum tally me Bank Reconciliation option ke dwara check karke unme Correction kar sakte he.to sabse pahle hum banking me jante he

Tally Cheque Printing

tally me hum is option ke dwara apne Bank ke Cheque books ko maintan kar sakte he. sath hi hum cheque me Payment Recieved karne wali Party ka naam, Amount or Date ko  us cheque Number ke anusar print bhi kar satke. yani dosto fir hame hatho se party ka name or amount fill karke cheque dene ki jarurat nahi padegi. hum tally me us cheque no. ke anursar payment ki Entry karke us blank cheque ko printer me dalkar usme party name, amount, date print kar sakte he.

Tally me Cheque  Printing kaise kare

Tally me Cheque print option ko Activat karne ke liye apko
cheque print option tally

F11 Feature me Enter karna he.
Accounting Feeture me Enter karna he.
then Go to Banking Feature
 Enable cheuqe printing     ?   Yes
Set/alter/ Transaction types   ?  Yes

then Enter Enter or Accept

apke tally me Cheque printing option Activate ho jayega.
ab abko apne Bank ka Ledger banana or usme cheques ki details fill karni he.

for example hamara Bank SBI Pithoragarh me he. jiski details he

Ledger :-SBI Bank a/c 43                                                                                                 
A/c Holder Name:- comapny ke naam se a/c he bank me (tallyseekhe)
IFS code:-SBIN0000700
A/c no.:-xxxxxxxxx43
Branch :-Pithoragarh Main

Cheque books details :- hamare pass 2 cheque books he jinme har ek cheque book me 100-100 cheque he

ab hum apne bank ka Ledger tally me Create karte he.
go to
Accounts Info>Ledger>Create>

Ledger:
Name:Sbi bank a/c 43
Under:Bank account
A/c holder name:tallyseekhe
A/c No.: xxxxxxxxx43
Bank Name:-Not applicable(education mode) or fill  bank name if ( activate License)
Branch:-Pithoragarh.

Alter cheque books Yes
Cheque Range for: SBI Bank A/c 43
From           To                  Number of       Cheque Book
Number       Number       cheque              Name
000001         000100          100                   Book 1
000101         000200          100                  Book  2


Alter Cheque Printing Configuration   Yes
is option me apko Cheque ka formate Print ke liye set karna hota he. agar aap Sample formate use karna chahte he. to apko CTRL+C button press karna hoga
 then
select
Sample Format.

apka cheque format Sample ke anusar Set ho jayega.
tally Cheque Print

cheque ka preview dekhne ke liye apko Alt+P press karna hoga.
or  print preview dekhe ke liye fir apko Alt+I press karna hoga.
then tally ask Print =Yes press kare
apko print ka format show hoga
Esc Button press karke back aye or

Mailling details fill kare
Name, Address, Country, State etc.

then Create the Bank Ledger.
apka tally cheque ke dwara payment ke time cheque print karne ke liye ready ho gaya he.

ab hum cheque Print ko ek transection ke dwara samjte he.
(i). Date:01-04-2018, Cheque no. 000002 Payment to Creditor Rs.10,000.00

iski Entry Tally me karne ke liye hume Accounting Voucher ke Payment Voucher me Jana hoga.
Accounting Voucher>payment Voucher (F5)

Banki Entry Tallyseekhe

Dr. hoga Creditor a/c 10,000.00
Cr. hoga SBI Bank a/c 43   10,000.00

then press Enter and open
Bank Allocation:- SBI Bank A/c 43
isme apko Bank ke madyam se ki ja rahi transect ka type or details fill karni he.
Cheque no. fill

Transaction Type:Cheque fill karna he
Cheque Range:-Book 1 000001 - 000100 wali select karni he
Inst no. :- jo cheque ke dwara payment ho rahi he uska Cheque no fill karna he. jaise hum 000002 no se payment kar rahe he to iske liye hume
Inst no.:-000002 fill kiya
Inst Date:- Cheque ki date for like us 01-04-2018
Then press Enter Enter

tally aap se Is cheque ko print karne ke liye puchega
Ager apko is Cheque ka print dekhna he to Alt+I press karke Print ke liye Enter or Y press kare
apko apne Cheque ka Print Preview show hoga.
tallyseekhe

ap apko apna cheque Book 1 se Cheque No 000002 printer me rakna he or fir
fir mouse se Screen ke Print me Click karna he apka Cheque no 000002 Print ho kar Printer se bahar nikal jayega.

ab hamne Cheque No. 000002 ka Cheque Creditor ko de diya or fir maan  ke chalte he Usne 03-04-2018 ko apne bank me jama kar diya.
To Be Continue....................  
 ap facebook page "tallyseekhe" ke madyam se bhi humse jud sakte he.
tally me sales order or Purchase order

           dosto kai bar company live sale purchase nahi karti unhe Buyer or Seller dwara Stock purchase or Sale ke liye jo Stock nahi he unhe Note karaya jata he. Un Stocks ko deliver kanre ka samay sima hoti he. is hi Order banan kaha jata he. jise bad me deliver kiya jata he. jis ke bad us item ki entry ki jati he.
Purchase Order:-company dwara jab kisi agency se Stock purchase karne ke liye uss Agency  ko wo Stock note karaya jata he jiski company ko awasykta he.use Purchase Order kaha jata he.
Example:- jaise hume Deep Agecy jo ki Delhi me he se. 10 pic LG LED Monitor chahiye  to hum use Deep Agency ko Note karayenge. jise  deep Agency ke dwara note karke  Us Stock ko bad me hame deliver karegi.

Sales Order:-jab buyer dwara Hamari Company se stock purhcase karne ke liye Stock ki details ko hame Note karaya jata he. to use Sales Order kaha jata he.
Example:- Jaise hume Kisi Buyer ka Order Recieved hota he. ji use hamane 5 Pcs LED Monitor Sale karne he. hum uska order banake ke use 10 days bad uske address me Stock ko deliver karenge.

Tally me Purchase or Sale Order option Activate karna.

           dosto is option ko activate karne ke liye apko sabse pahle F11 press karke Feature me jana hoga.
then apko I press karke Inventory Feature me jana hoga.
apko Order processing Category show hogi uske options ko yes karna hoga.
Purchase Order on karna
Enable Puchase order Processig =Yes
Enable Sale order Processing =Yes
then 
press CTRL+A
apke tally me Purchase Order or Sale Order ka option Activated ho jayega.
jo kis apko Invetory Voucher option ke niche show hoga.
tally Purchase Order
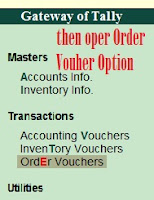
OrdEr Voucher:-is Voucher ki shortcut key E hoti he. is Voucher me Sales or Purchase Voucher banaye jate he. 
Purchase Order Voucher:- iski shortcuts key Alt+F5 he is voucher me Purchase order banaya jata he.
Sales Order Voucher:- iski shortcuts key Alt+F4 he is voucher me Sale order banaya jata he.

          Purchase or Sale Voucher ke option hame Accounting Voucher me bhi jake mil jate he. waha kewal hame inki Shortcuts key press karni hoti he or ye on ho jate he Order banane ki Entry ke liye. dosto tally me Purchase Order or Sale Order ka Balansheet me koi prabhav nahi parta 

           dosto ab jante he tally me Puchase or Sale Order kaise banante he. jisko hum ek example ke jariye samajte he.
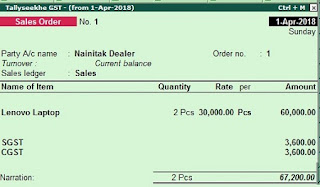
            hamari Company jo ki Utarakhand me state me wo Bihar ki Company se stock (lenovo 4pcs.X10000=40000) ka purchase karne ke liye Order date 1-4-2018 ko banati he or use Bihar ke Company ko de deti ya note karne ke liye deti he. Behar dealer use note karke uske agle din wo 2-4-2018 saman hume delivered kar deti he. or fir Hamari Company dwara us Purchase goods ki Entry Tally me Purchase Voucher me ki jati he jisme hame kewal order no fill karna hota he baki stock ki details tally atometic hi fill kar deta he.  Isi prakar humari company ko Nainital ke ek dealer dwara stock(lenovo 2pcs.X30000=60000) purchase karne ke liye stock note date 1-4-2018 ko karaya jata he jiska Sales order hamari company dwara banaya jata he or uske agle din hum 1-4-2018 us Stock ko Nanital Dealer ko delivered kar dete he. jiski Entry ham Sales voucher me karte he. isme bhi hame dewal Party ka naam or order no fill karna hota he baki details tally auto fill kar deta he.

Purchase Order kaise banaye

dosto iske liye hame Accounting Voucher me Enter karke alt+F5 press karna hota he.
then fill Party name:-Bihar Dealers
Supplier's Details:-auto fill (Ledger ke Anusar)
then fill
Order no.=1
then select purchase Ledger
then select Item Name=Lenovo Laptop
then open
 Item Allocation for : Lenovo Laptop
Due on :-fill date or Due time of Deliver date.(like us 1days or 2-4-2018)
fill
Quantity:- 4Pcs,
Rate:-10000
Amount:-40000 (auto fill)
ager ap 2nt Item ka order banana chahte he to fill kare
Due on:- days or dates(Other wise blank)
then
Enter
fill GST
then Enter
or  Enter Enter
Purchase Order in tally
apka Purchase Order no.1 banke Ready ho gaya he.
jiski details aap
Purchase Order Outstanding me dekh sakte he. iske liye aap ko
Display/StatEment of Inventory/Purchase Order Outstanding/Stock Item/Item name   Enter karke show  hogi
dosto agle din hame deye gaye Order ka Stock Recived hota he jisk Entry humne  Purchase Voucher me hogi

Press F9 or Go to Purchase Voucher.
Enter Party name:Bihar Deler
then open
Order details
Purchase Entry
Order No. 1 (yaha per apko apna order no select karna jiski entry hame purchase me karni he.
then
Order ki sabbhi detials Auto fill ho jayegi Purchase voucher me
Item name me Bhi
 ---------------------------
Order no.:-1 fill kare
then
next Order no. me End of lest fill kare.
then Enter Enter or CTRL+A

tally seekhe
apki Purchase Entry complete ho jayegi.

isi prakar aap Sales order bhi bana sakte he.

Sales order kaise banaye tally me

Go to Acconting Voucher and Press F4 Sales Voucher key
fill Order details
Sales Order in tally

Accept Entry CTRL+A

 Ager aap Sale order ki details dekhana chahte he. to iske liye aap ko Get way of  Tally me
Display/StatEment of Inventory/Sales Order Outstanding/Stock Item/Item name   Enter karke dekh sakte he.

tally in hindi
dosto agle din Nainital Dealer ko Stock deliver ho chuka he. ab hume Sales Voucher me Entry karni karni he
go to Sales Voucher
iske liye aap F8 press karke
Party Name:-Nainital Dealer Select kare
Order Details me
tally seekhe
Order no. 1
Dt: fill order date
then Enter Enter
Item name:
Order no.1
Next Order :end of list
Sales order in GSt
Enter Enter Complete Entry ho jagegi
ap facebook page "tallyseekhe" ke madyam se bhi humse jud sakte he.
tally se e-way bill kiase create kare

tally ke latest version tally erp 9 release 6.4 or above ke version me apko e-way bill ki .json file create karne ka option milta jiske dwara apko invoice ki .json file create karke use GST e-way bill portal me upload karke asani se e-way bill generate kar sakte he. to jante he.

tally learn in hindi

tally me e-way bill create karna.

dosto sabse pahle akpe pass tally ka latest version 6.4 or 6.4 se above ka download karke install ya apna tally ko 6.4 me update karna hoga iske bad hi apko tally me e-way bill se related option show ho payenge.

tally me e-way bill option activate karna.

tally me e-way bill option ko activate karne ke liye
step 1:- Press f11 Feature.
step 2:-to go Statutory & Taxation or press S key

step 3:-Enable goods & Service tax(GST) =yes
then

step 4:-set/alter GST detaisl =Yes

then

step 5:- e-Way bill applicable  =yes
e-Way bill applicable  from :- ya date fill karni he 1 April se ya 1 Feb or 15 April (jo date ap fill karenge uss date se pahle ki entry karne per e-way bill generate nahi hoga.)
step 6:-e-way bill threshold :=50000 (yaha per e-way genrate ke liye minimum amount kya he. fill karni he.)
then Enter Ener or CTRL+A

dosto is process ke bad apke tally software me e-way bill option activate ho jayega.
ab apko tally me

Sale voucher or Purchase Voucher me Invoice mode me Entry karni he. jaha per apko e-way bill ka option Show hoga.

e-way bill ki .json file tally me create karna.

dosto ab hum ek entry karte he jiska hame e-way bill generate karna he.

2.goods Sold Delhi 1,68,000.00 and invoice are-
Item name                Quantity       Rate           per         Amount
Lenovo laptop            5Pcs.             30,000.00   Pcs.      1,50,000.00
IGST                                                                                  18,000.00     
Total Amount                                                                  1,68,000.00    

to go tally
Enter
Accounting Voucher
Go to Sales Voucher or Press F8 
e-way bill tally
Party name:- Delhi Dealer
Fill karte  Dispatch  and Buyer’s Details (Ye bahut jaruri he e-way bill ke liye)
                     Dispatch details:
-------------------------------------------
Delivery note: end of list ( Agar aap Godown se goods deliver karte he. to delivery challan no. fill karna he  other wise no.)
IF ASK DATE
date:-Godown se delivery Challan generate date fill karte he.)
dispatch doc no. :Transport dwara Create document no. (NO)
Dispatched through : Transporter Name
Destination :- Jis jagah goods diliver karne he us jagah ka naam (like delhi)
Bill of Lading /LR-RR No: 150
Date:-date fill
Motor  Vehical No. DL1LR-1262 (gadi ka number fill kare)
                     Order detials:
--------------------------------------------
Order no:- agar hamne pahle order banaya he to us Order ka no. fill kare
Mode/Term of Payment:-Cash or Credit (due date )
Other Reference(s):- agar koi Reference he to aap type kar satke
Terms of Delivery:- Free or Slipped Charge se koi bhi Terms use kar sakte he.

                    Buyer Details:
Buyer:-Name of (Buyer) Person
Address:-
Country:-
State:-
Place of Supply:-
GSTIN/UIN:-
(Ledger ke asusar auto fill hoga /cash me hone per hame fill karna hota he.)

Sales ke liye Sale ka GST applicable Ledger select karte he.

Item Name:Lenovo Laptop
Quantity: 5pcs
Per Price: 30,000.00
then Select End of List kyo ki Is Item ke bad hamne koi or Item Purchase nahi kiya he.
then Lenovo Laptop 1pcs ka Sale ka Total Price hua 30,000.00
ab Tax ke Ledger select karte he
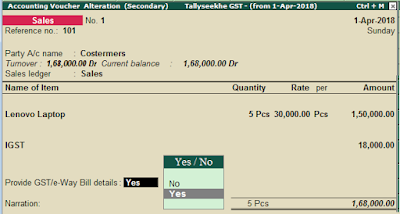
IGST=18,000.00
Net Price hua =1,68,000.00
 
Provide GST/e-way bill details :no/Yes Yes me enter kare
tallyseekhe
Additional Details :Inter state Sale taxable
----------------------------------------------------
                         e-way bill details
e-way bill no: generate nahi hua he. is karan blank hota he.
Sub type*:Supply
date:date jis din e-way bill generate kiya he.
Document type: tax invoice
              Transporter details 
Mode*: Road/Train /Other
Transporter Name:-
Doc/Lading /RR/Air way no:-152
Transporter Id**:Buyer ka GSTIN or Other ID
distance (in KM)*: distance fill kare (company se Buyer )
Vehicle Number**:  (Gadi ka no fill kare Is format me GST State code fir Gadi ka no.)
              Consignee details:
Consignee:-Corrial name
Adress 1:
Address 2:
To Place:(Destination) (jaha deliver karna he us jagah ka name)
State*:delhi
Pin code:
GSTIN /UIN*:

then apkp Entry accept karni he.
then
Exporting details for e-way bill:- Yes or NO me click karke same details fill kare.

Format:-JSON e-way bill Details (Data Interchange)

Export Location:- file This PC or My comper me jis folder me save karni he uss chune.

Output File Name:file ka name type kare.
Open Exported Folder: Yes agar ap chahte he ki file export karte hi open ho jaye. like us (E:\\)
then 
enter
enter
Export  Yes or NO Y press kare.
apki e-way bill (this pc or my computer ke E: Drive open ho jaygi.
ap hame is e-way bill ki .json file ko e-way bill GST portal me Log in karke upload karna he. jiske bad hume e-way bill no provide karaya jayega.

step 1:- portal open kare

step 2:- e-way bill option me
Click to Generate Bulk

step 3:- apko  e: drive se ya jaha apne tally ki file save ki he us folder se tally ki .json file upload karna hi

 to aap  folder se file upload kare
then
step 4:- click upload

note:-Ager koi error ata he to uss error ko dekhe or tally se us error ko sahi karke dobare e-way bill ki .json file ko upload kare.

step 5:- then click Generate
apka e-way bill no Generate ho jayega.
us e-way bill no ko Copy kare. jiske dwara aap e-way fill ka print out nikal sakte he.
then

e-way bill no. se e-way bill print karna.

step 6:- click to home.

step 7:- e-way bill option me
step 8:- then click
EWB Print
enter
EWB NO:- yaha e-way bill no fill ya paste kare.
step 9:- then click Go

apka eway bill print ke liye ready ho jayega.

ap apko detail dekhane or print ke liye

step10:- Details prints me click kare.

then click to print apka e-way bill ka print out printer se nikal jayega.

ap apko tally me e-way bill no invoice me fill karna he iske liye ap tally me jaye. or e-way bill wali
invoice ke Update e-way bill Information me
Note:-Agar entry complete ho chuki he or option show nahi ho raha he to aap
Display/StatutOry Report/GST/e-Way Bill/Update e-way bill Information /
me jaye or
Buyer ka Ledger select kare.
date:-from to fill kare
or fir e-way no fill kare.

e-way bill no  : fill kare.
then Entry complete ho gayi he apke e-way bill ki.

e-way bill ki Reports dekhana

tallyseekhe

iske liye apko 
step 1:- Display/StatutOry Report/GST/e-Way Bill/
me Enter karna hoga.
step 2:- e-way bill Reports
option me enter kare.
apko details show ho jayegi.


ap facebook page "tallyseekhe" ke madyam se bhi humse jud sakte he.